
How to Install Arch Linux and Hyprland (Part 1 of 2)
01/11/2024
I've written up this guide to help anyone who wants to get into Arch Linux. Specifically, Arch Linux with the Hyprland window manager as it has become a popular combination. This guide should ideally provide a mix of concise installation steps along with a little bit of an explanation for why we take these steps as I believe the technical knowledge gained from installing Arch is good to have.
I'll divide this guide into 2 parts:
-
Installing Arch Linux (This article)
-
Installing and Configuring Hyprland
These stages are independent of each other. That is, if you just complete the "Installing Arch Linux" section. You can wait until tomorrow to complete the Hyprland section.
Why not use archinstall?
If you didn't know already, Arch has gotten much easier to install via the built-in archinstall script. This script basically guides you through setting up a basic system.
It pretty much automates everything we're going to do here and will probably be a bit quicker. If you really wanted to you could just leave this guide, run archinstall and get a good system going.
Despite this, I'm still an advocate for being at least somewhat familiar with the manual install since:
- I believe you'll learn a bit more about Linux's commands and concepts by manually executing them to build your system
- More advanced setups I have read can be a bit messy with the automated installer
- One of Arch's selling points is to truly put the user in control on what happens with their system. Using a black box of an installer kind of contradicts the point of using Arch
- Manual install is honestly not that difficult compared to maintenance.
- You'll probably get more satisfaction with the end result doing things manually
If you want an Arch based system with an easy install, I'd recommend using EndeavorOS.
Assumptions and Prerequisites (Important, Please Read)
-
Make sure to back up any important data on your current drive as this will be wiped when installing Arch.
-
UEFI will be assumed over legacy BIOS since most modern devices support it and I want to keep this guide concise.
-
Above all else, you need to be willing to search online for solutions for when things (eventually) go wrong. I installed Arch as my first distro but I had to try four times to get it right and had to look on Reddit and the Arch Linux forum to find solutions to various (very beginner) issues. If Arch is your first distro as well, I recommend setting aside a weekend to give you ample time.
-
If your device has an ethernet port, I recommend plugging into your router for a wired connection. While a wireless connection isn't hard to set up, an ethernet connection ✨just works✨
-
I believe that learning what's happening as you install Arch is just as valuable as the finished installation. Throughout the guide, I'll be putting little explanations in italics. While I recommend reading them to learn more, you can absolutely ignore them and get a functional setup. If you just follow the commands shown in the guide installing Arch will not be hard but there is a lot of things you can learn.
-
Dual booting with Windows won't be covered in this guide to keep things from getting too long. I will write another guide on how to setup a dual boot system between Linux and Windows for GRUB (the bootloader of choice in this guide) later.
-
Knowing the basic specs of your device will help during the installation mainly whether you have an Intel or AMD CPU (if you have Apple Silicon then this guide will not work) and the size of your disk.
ok ok let's begin!
Stage 0/3: Booting Arch
Preparing the ISO
First we need to get a disc image (ISO file) of Arch Linux and put it onto a USB. Just like we would if we were installing Windows.
To get the ISO visit the Arch Linux downloads page. To download you'll either need a BitTorrent client (I recommend qbittorrent) to open the torrent file or you can directly download in the browser.
Next you'll need to put your ISO onto a USB drive. In my experience I've used three pieces of software for doing so.
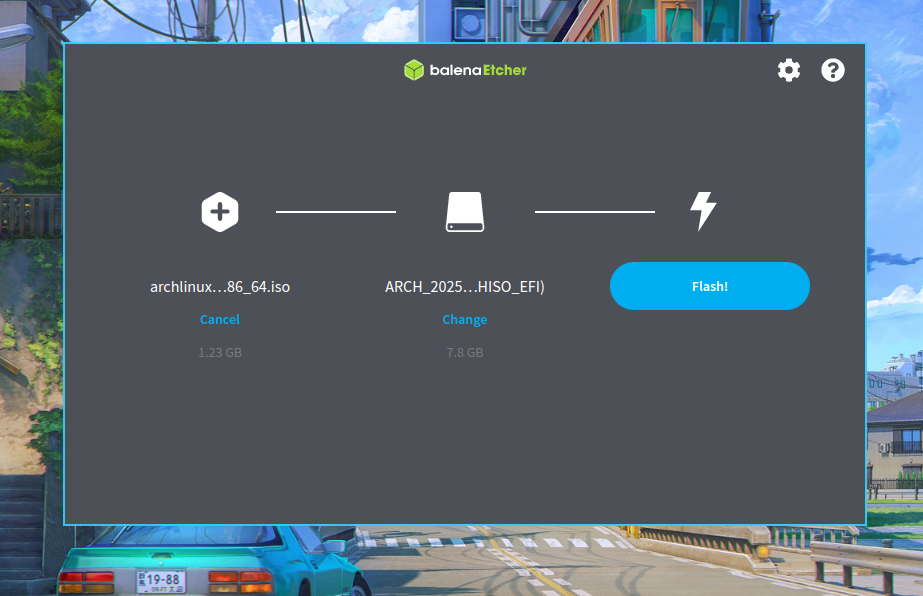
- BalenaEtcher
- Rufus
- Ventoy
BalenaEtcher is the easiest (although they're all easy to use). Just select your ISO file, your USB drive then hit flash.
Booting
Put the USB drive into your computer, press the power button and spam whatever key gets you to your BIOS or boot menu. Usually this key can be DELETE, F12, F11 or F8 however the finding your correct key is one Google search away.
Hop into the BIOS and select the USB drive. You'll soon be taken to a screen that looks something like this

Hit ENTER and eou'll be placed into the live ISO environment.
Soon you should see a prompt like this.
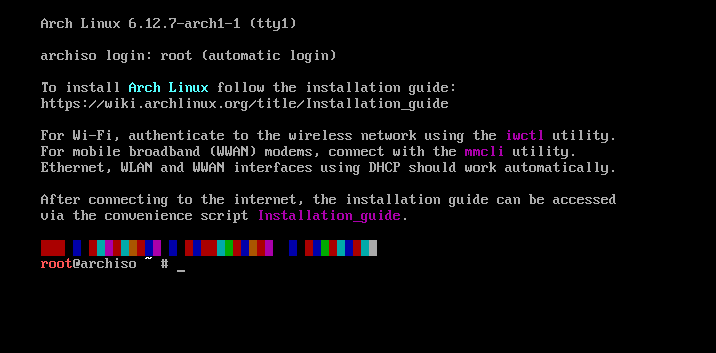
This is the live environment. It's a minimal system that provides you just enough commands to install Arch Linux. Live environments are nothing new. Other distros like Ubuntu and Mint will place you into a live environment. The main difference, however, is that you're provided a graphical user interface (GUI) whilst Arch, following the KISS (Keep It Simple Stupid) philosophy, uses a very minimal command line interface (cli).
Setting Keymaps (optional)
If you use an alternative English keymap such as COLEMAK/DVORAK or a language-specific keymap such as QWERTZ or ZHUYIN. You can switch from the default US keymap through these commands
List the available layouts. Use the keys 'j' and 'k' to scroll down and up respectively (vim keybindings).
1
localectl list-keymapsSet your keymaps using loadkeys.
1
loadkeys de-latin1Stage 1/3: Disk Setup
Partitioning the Disk
WARNING: Partitioning a disk will result in all the data on that disk being wiped. Make sure you've backed up important data from that disk and ensure that the backup actually works before proceeding. 5 minutes spent is worth removing the risk of losing 5 years worth of data.
To start our installation, we need to section our storage medium into different partitions.
We'll use the fdisk tool to partition the disk.
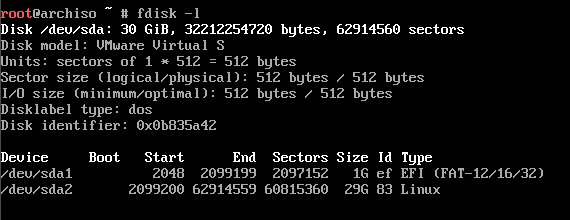
We'll need to find our disk first. Run the command fdisk -l
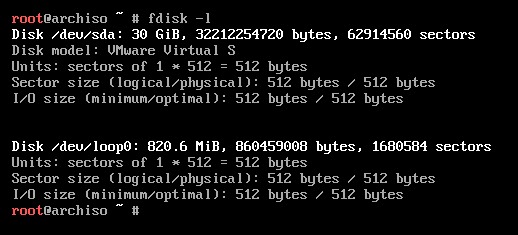
You need to find the correct disk and look for the block device assigned to it. Block devices refer to /dev/sda or /dev/nvme0n1. In many cases your device will be a size of 128GiB, 256GiB, 512GiB or 1TiB. If you know how much storage you have look for a block device with a size close to that.
Since I know I want to install to the 30 GiB disk (this is in a VM), I'll be using the /dev/sda block device. Make sure you know yours.
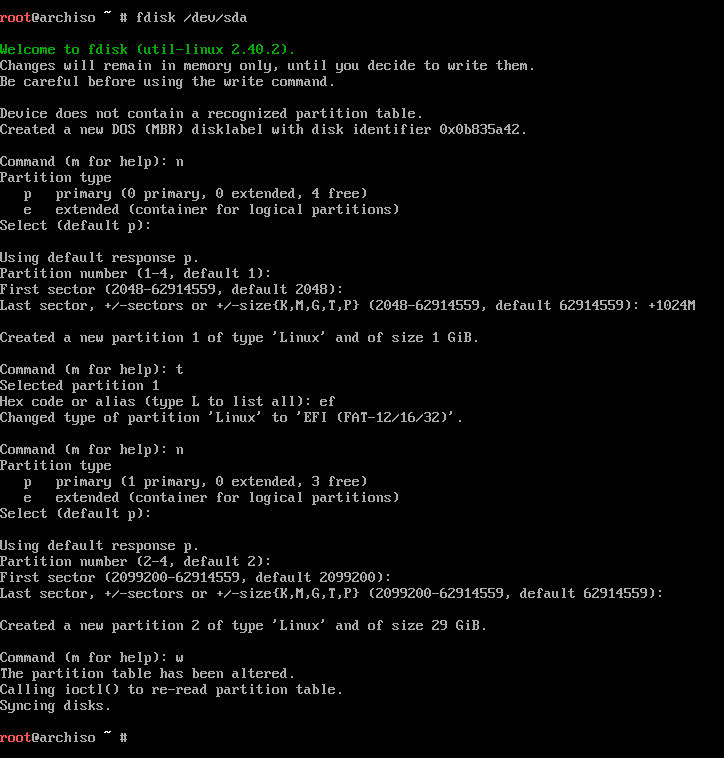
Now we're going to partition the disk. Enter these commands:
In my case:
1
fdisk /dev/sdaIf your drive already has partitions on it, we'll have to delete them
Enter the character 'd' and hit enter. Keep repeating this until you get the message "no partition is defined yet"
Now enter these keys
1
2
3
4
5
6
7
8
9
10
11
12
13
14
15
16
17
18
19
# any prompts you receive about the filesystem containing a "signature" just answer yes "Y"

n # Make a new partition this will be our EFI system partition (ESP)
ENTER
ENTER
ENTER
+1024M # Set the max size to 1024MiB or 1GiB
ENTER
t # Change the partition's type to be recognised as an ESP
ENTER
ef
ENTER
n # Create another partition. This will be our root partition
ENTER
ENTER
ENTER
ENTER
w
ENTER
You'll see that we're hitting ENTER a lot. We're just accepting the default options offered by fdisk. For us that will suffice.
Your screen should look something like this
Running fdisk -l again should now show your newly partitioned disk.
This is a very standard and simple partition layout. We allocate 1GiB to our ESP which stores our bootloader, kernel image and initramfs. We then allocate the remainder of our disk for Linux itself our root partition. This is where Linux's system files will go along with your own data.
Formatting the Disk
Now that we have divided our disk into partitions, we must format them and create their own filesystems.
Referencing the above image, you should now have 2 partitions on your disk. One EFI partition, and one root partition. These partitions have their own block device identifiers. In my case my ESP has the identifier /dev/sda1 while root has /dev/sda2.
Remember the block device for your ESP and root partition or write them down somewhere. We'll be using both of them later in the guide.
Once you know yours run these commands:
1
2
mkfs.fat -F32 /dev/sda1
mkfs.ext4 /dev/sda2 # this one may take a little longer depending on your disk size
While the ESP must be formatted to FAT32, our root partition can be a formatted to a filesystem other than ext4. While ext4 is probably the simplest and most common filesystem, there exist many other types such as BTRFS or XFS which each have their own benefits and drawbacks. Ext4 is simple but reliable, technically faster and has anecdotally been more resistant to data corruption in the event of sudden power loss.
BTRFS allows for snapshots meaning you can rollback to a previous good state if an update breaks your system. Additionally, it provides features such as transparent file compression which can increase usable disk space. XFS is common on enterprise servers but is also popular on Gentoo and is the filesystem recommended by the install guide.
Arch's benefit comes from granting levels of control of your operating system all the way down to the filesystem level. While this guide does not cover BTRFS since I personally do not use it and as such am not qualified to teach others how to install it, resources to cross-reference are abundant online.
Mount the File Systems
Next we need to mount the partitions. Mounting is required to make them accessible to other Linux programs, which will be needed to continue the installation.
1
2
mount ROOT_BLOCK_DEVICE /mnt
mount --mkdir ESP_BLOCK_DEVICE /mnt/boot
Here we're making our root partition accessible under the directory /mnt. Our ESP is accessible under the directory /mnt/boot.
The hardest part of the installation is over.
WiFi
Devices plugged in through ethernet should be able to connect to the internet just fine. If your device is connected through ethernet then you can skip this step.
A simple ping can tell if the internet is reachable
1
ping google.comYou should get responses from the server if the device is connected. Press CTRL+C to stop.
However if your device needs to connect via WiFi. You'll need to use the iwctl command to do so.
Run these commands
1
2
3
4
5
6
7
iwctl
station list # this will show your wireless cards usually it will be wlan0
station wlan0 get-networks
station wlan0 connect YOUR_WIFI_NETWORK
# enter the password when prompted
# you should be connected soon
# press CTRL C to leave
Mirror Configuration
Mirrors refer to web servers that host copies of files (in this case packages) in order to reduce server load by distributing it across a larger network and improve download speeds by placing mirrors across many countries to ensure users are (ideally) close to a mirror in their own country to download from.
In order to improve our download speeds, we're going to sort Arch Linux's mirrors by their speed based on our current location. We can accomplish this using the reflector package.
1
2
pacman -S reflector
reflector --latest 5 --sort rate --save /etc/pacman.d/mirrorlist
Install the Base System
The next phase of our installation requires us to install a collection of packages that are integral for Arch Linux to function. This will be accomplished using the pacstrap command that comes with the live environment.
Before we do that, we must first synchronise pacman with the server to ensure that the packages we are downloading are the most recent.
Run
1
pacman -SyyThis is akin to commands such as apt-get update on Debian-based distributions.
Then
1
pacstrap -K /mnt base linux linux-firmwareThe pacstrap command is simply an alias for the pacman command pacman -r /mnt -Sy --cachedir=/mnt/var/cache/pacman/pkg --noconfirm. Here we are telling pacman to install the packages base (the suite of basic packages for Arch), linux and linux-firmware to /mnt directory (where we've mounted our root partition).
If you want, you can change linux to another kernel such as linux-zen however switching after installation is very easy.
The 'K' flag we pass tells pacman to initialise an empty keyring. Since Arch Linux uses PGP keys to determine package authenticity, we need a keyring to store those keys. How PGP works is beyond the scope of this guide however an explanation can be found here
Stage 2/3: System Setup
Enter the New System
We've now installed the basic packages for Arch Linux. Use the arch-chroot command
to enter (or chroot) into the new system.
1
arch-chroot /mntThis arch-chroot command is incredibly useful as it allows one to enter a functioning or broken system. I myself have used it countless times to fix my own Arch install and even one time used it to get into a Windows system that was locked due to malware to backup data.
If your install ever breaks. I recommend booting back into the live environment, mounting the disks under /mnt (or anything really) and then using arch-chroot to get back in and start fixing things.
Generate the Swapfile
This is a technically optional (however recommended) step.
Many operating systems whether they be Unix or NT-based have some form of swap space. This is a dedicated section on the disk that is not used for storing files but for storing the contents of memory when RAM runs out. When RAM is depleted on a system, data in RAM is temporarily moved to the swap space to free up memory. In Linux systems, swap space can either be in the form of a partition or a swapfile. We'll be making a swapfile since it's slightly easier to resize.
Create a swapfile using this command. You're free to decide how much or how little space you allocate for this swapfile however the same amount of memory as your computer is generally a good guideline. If your computer has 16GiB of RAM then you'll pass 16G to the command.
1
mkswap -U clear --size 16G --file /swapfile # create 16GiB swapfile for 16GiB RAMNext activate the swapfile
1
swapon /swapfileGenerate the FSTAB File
An FSTAB is a file that provides Linux with information relating to disk partitions, block devices or remote file systems. You can think of it like a blueprint that tells Linux where your partitions should be mounted and their file systems among many other things. More information can be found here.
We'll use the genfstab command which comes with the live environment. However we'll have to exit our Arch Linux back to that environment where we can use it.
1
2
exit
genfstab -U /mnt >> /mnt/etc/fstab
Chroot back:
1
arch-chroot /mntInstall Basic Packages
We're going to install a collection of important packages that will be used extensively.
1
2
3
4
5
6
7
8
9
10
11
12
pacman -S vim nano sudo iwd dhcpcd git base-devel networkmanager neofetch

# Packages explained:
# vim: Text editor we will use later in the guide
# nano: Vim's easier but less cool brother.We'll use nano a few times as well.
# sudo: Temporarily grants a non-root user root privileges
# iwd: CLI tool to connect to WiFi
# dhcpcd: DHCP client (we'll enable this later to get internet access)
# git: Version control software we'll use to download yay (AUR helper) later
# base-devel: Key packages such as gcc and make needed to build from the AUR
# networkmanager: dhcpcd is our DHCP client however we still need network manager to work alongside it for internet access
# neofetch: Show people that you use Arch btw
You should also install microcode for either your Intel or AMD CPU.
1
pacman -S intel-ucodeor:
1
pacman -S amd-ucodeA non-Chatgpted explanation of microcode goes way beyond what I know. From what I gather it's basically firmware for the CPU itself.
Timezones
Use the keys 'j' and 'k' to navigate down and up.
1
timedatectl list-timezonesSet your timezone
1
timedatectl set-timezone Australia/MelbourneSet the hardware clock
1
hwclock --systohcSet timedatectl to synchronise the clock using NTP.
1
timedatectl set-ntp trueLocales
Locales are used by libraries such as glibc for rendering regional monetary values, time and date formats along with characters specific to different languages.
We will use nano to edit the file /etc/locale.gen. If you know Vim, you can use that instead.
1
nano /etc/locale.genUse the arrow keys to move down until you find en_US.UTF-8 or en_GB.UTF-8 delete the '#' to uncomment either en_US.UTF-8 for American English or en_GB.UTF-8 for British English. Various other English locales can also be uncommented.
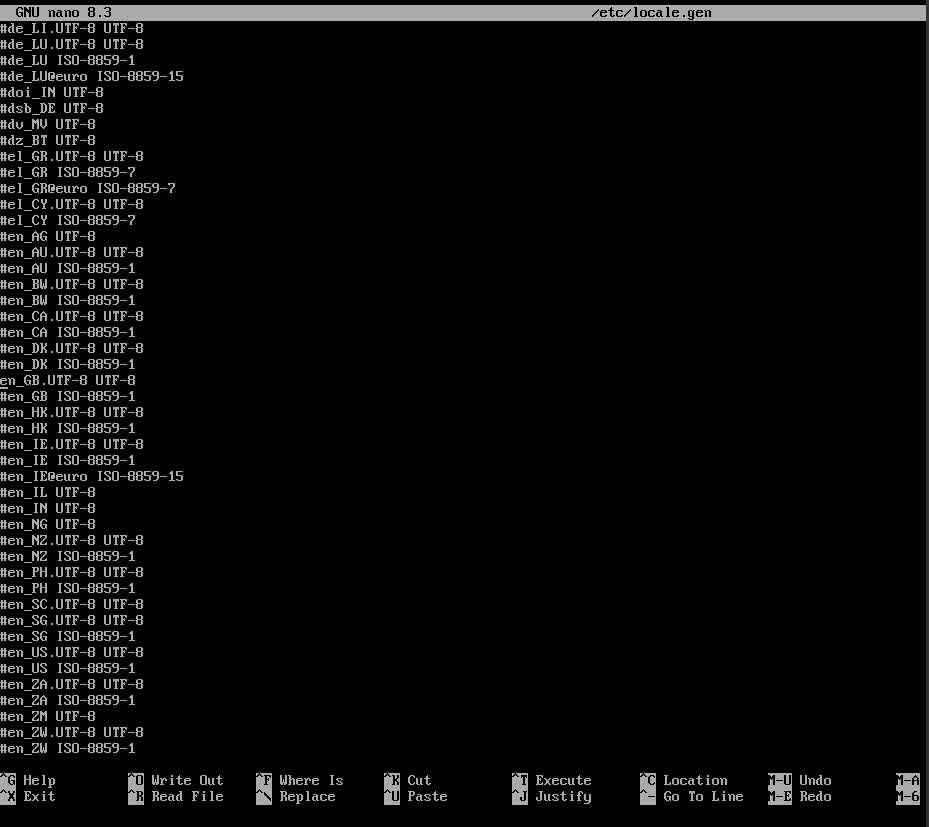
While you can just use English locales, you may need to enable a few more locales using the same method if your text does not render correctly. To display titles for my Chinese, Japanese and Korean songs on Spotify I needed to enable the ja_JP.UTF-8, ko_KR.UTF-8, zh_CN.UTF-8 and zh_TW.UTF-8 locales. If your applications need to display different languages you will need to enable more.
Press CTRL+O and hit enter to save the file. Then CTRL+X to exit.
Run
1
locale-gento generate the locale.
Then set your preferred locale
1
echo LANG=en_GB.UTF-8 > /etc/locale.confecho is a command to print characters to the screen (more technically stdout). Combining this with the > character means we send the output of echo into the file /etc/locale.conf. LANG refers to an environment variable that dictates the global locale.
Hostname
The hostname will be your device's name or any name for that matter. We will write to the /etc/hostname file using the same echo command we used to set the locale.
1
echo Thinkpad-T420 > /etc/hostnameAccount Setup
Set the root password.
1
passwdIt's good practice to use a strong password for the root user as it holds the highest amount of power over the system. This importance, however, is diminished if you're the only person using the device.
Next we're going to create a new user.
1
useradd -m johnThe -m flag will add a new /home directory for you new user.
Set the password for your new user.
1
passwd johnPut our user into the wheel, audio, video and storage groups.
1
usermod -aG wheel,audio,video,storage johnIn our system, any member of the wheel group will be able to use root privileges via sudo. However we need to update the /etc/sudoers file via visudo.
1
visudovisudo differs from simply editing /etc/sudoers using an editor like Vim or Nano since it does a sanity check of the configuration file before saving changes. This is important as a misconfigured sudoers file can result in sudo being unusable.
Visudo uses Vim keybindings. Just like how you scrolled through timedatectl list-timezones, you will use the 'j' and 'k' keys respectively to move the cursor down and up.
t
Move your cursor until it is under the # character of the line %wheel ALL=(ALL:ALL) ALL.
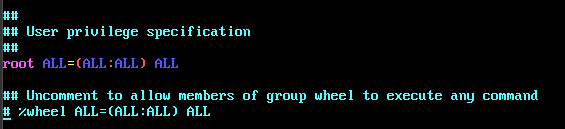
Hit the key 'x' to delete that #.
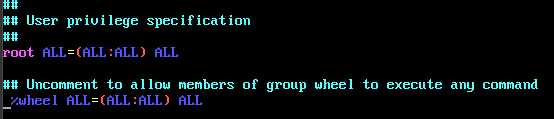
Now to exit Vim.
Press :wq then hit ENTER. This both writes the changes and exits Vim.
Hang in there, we're nearly done.
Stage 3/3: Bootloader Setup and Finishing Touches
Setting Up GRUB
A bootloader is required for nearly every operating system. At a high level, a bootloader is a program responsible for initialising everything needed for a computer to boot such as (in the context of a Linux system), your kernel and its initramfs
Bootloaders come in two types first-stage and second-stage. Bootloaders like GRUB or systemd-boot are second-stage bootloaders. First-stage bootloaders refer to your BIOS or UEFI. First stage bootloaders initialise the essential hardware needed for minimum functionality through a process called "Bootstrapping". Second stage bootloaders are loaded by the first stage and load everything needed such as the kernel.
We'll be installing the GRUB bootloader. Since this guide assumes the use of a UEFI system (which implies the presence of an EFI partition) we'll need to install efibootmgr as well.
1
pacman -S grub efibootmgr1
mount ESP_BLOCK_DEVICE /boot/efiNext we need to install GRUB to our ESP.
1
grub-install --target=x86_64-efi --bootloader-id=GRUB --efi-directory=/boot/efiGRUB requires a configuration file in order to work so we need to generate one.
1
grub-mkconfig -o /boot/grub/grub.cfgFinishing Touches
Enable the DHCP service using systemctl
1
systemctl enable dhcpcdDynamic Host Configuration Protocol or DHCP is a system used for assigning local IP addresses. It works on a client-server model where your router runs a DHCP server that listens for requests from a DHCP client. When it receives the request, the server assigns an available IP address for the client's device to use.
We'll also enable the networkmanager
1
systemctl enable NetworkManagerIf you need WiFi then enable iwd as well
1
systemctl enable iwdExit back to the live environment and unmount the disks.
1
2
3
exit
umount /mnt/boot
umount /mnt
Finally reboot the computer either through the power switch or via command line.
1
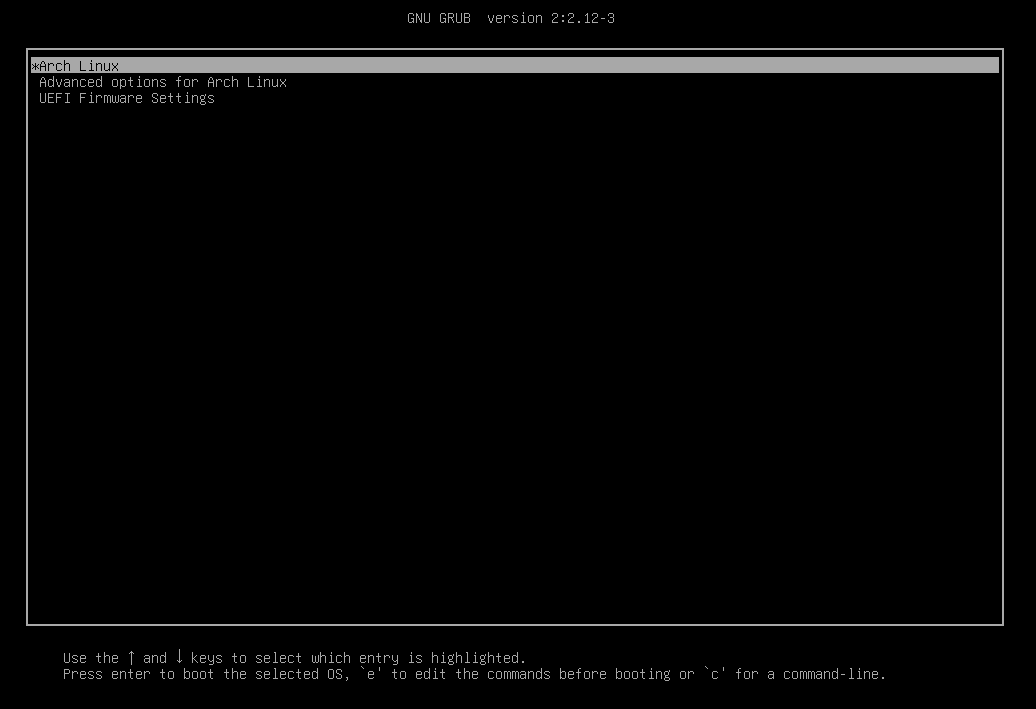
reboot nowIf all goes well, you should see the GRUB bootloader menu.
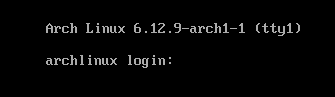
Hit ENTER and you'll soon be taken to this login prompt.
Sign into your account and enter neofetch.
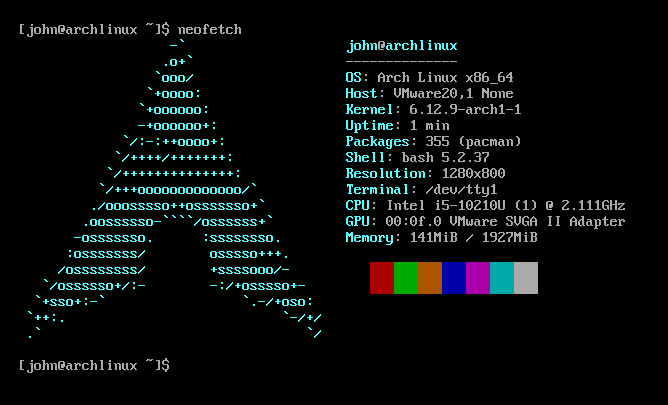
You've now installed Arch Linux.
At this point you should have a minimal, CLI Arch Linux install ready to use Hyprland. That will be a second guide though. This document is far too long already.
Back